


Learn how to autofill data in cells and columns in LibreOffice Calc sheet with different methods with examples.
Inputting data into a spreadsheet can be a tedious and time-consuming task. However, Calc offers several features that can help alleviate some of the drudgery associated with data entry. There are a few ways by which you can easily autofill data in LibreOffice Calc.
Table of Contents
Using Autofill in LibreOffice
Drag handle
Perhaps the easiest way for a quick autofill with the same text or numbers is a “drag handle”. What is a drag handle?
If you move your pointer to the “right-bottom” of a cell, you should see your mouse cursor change to “[+]”. While using it, you can hold & drag your mouse upwards, downwards, left or right. When you use this method on a cell which has a value, LibreOffice Calc fills it up with the same value until the place you drag.

You can also use this to autofill multiple selected rows and columns.

Note: If your selected cell contains a number, a series will be created by incrementing the number. For example, in the above image, you can see Col3 is incremented to Col4. You can prevent this incrementation by holding CTRL while dragging. It will then copy the cells.
Pattern matching auto input
LibreOffice Calc can identify similar texts from all cells in a column and can suggest you autofill. To do that, ensure you have Tools > Autoinput checked in the menu.
Start typing the text in a call, and LibreOffice Calc will automatically suggest you the matching items as shown below. You can press ENTER to accept the autocomplete and go to the next cell.

If you need to see more options that begin with the same letters, you can use the following key combinations: Ctrl+Tab to move forward, or Ctrl+Shift+Tab to move backwards.
To display a list of all the available AutoInput text items for the current column, press Alt+↓ (down arrow) on your keyboard. This will show a small menu with a unique list of items that are available in that particular column.
Using Quick Copy with CTRL+D
At any time, if you press CTRL+D (fill Down) in any cell, the cell will automatically populated by the data from the above cell. This includes texts, numbers and formulas.
This way you can update your Calc spreadsheet faster.
Using Fill Cells tool
- For filling up with incrementing series, repeated values across thousands of rows or columns, you can use the Fill Cells option. The options are available under Sheet > Fill Cells.
- Select the entire range of cells and then choose any of “Fill Down”, “Fill Up”, “Fill Left”, or “Fill Right”. LibreOffice Calc will automatically fill up with the data from the first cell.
- See the below example.

Filling incrementing or growth series
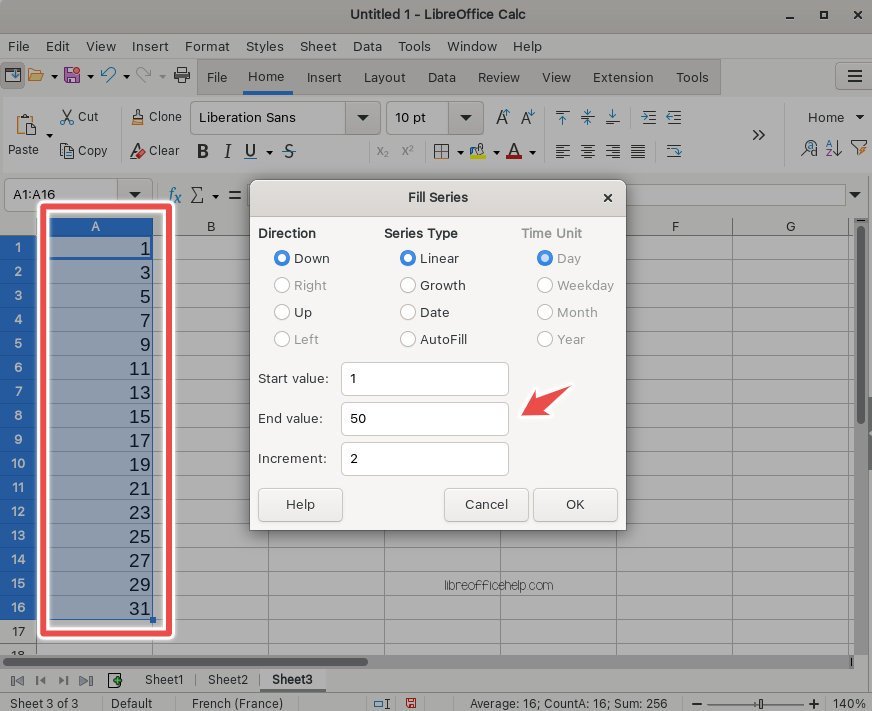
- If you want more control over the number generation, such as you want to fill, say, 1 to 10,000 in rows or columns, you can use the “Fill Series” option. Here’s how.
- From the menu, select Sheet > Fill cells > Fill Series.
- It will open up a separate dialog. You can enter the start value, end value, increment value and fill up the cells. Before using this, make sure to select the range of cells.

Using Autofill series with pre-defined values
- Using the Sort List feature, you can define your custom list in LibreOffice Calc. Then, use the sort list to autofill using the drag handle.
- The option is available under Tools > Options > LibreOffice Calc > Sort LIst.
- In the Sort List window, you should see some pre-defined values, such as weekdays and months pre-loaded.
- You can also click on new and define your custom list or copy from a series of cells.

Example of custom list for autofill
Say, I want to define a custom list for all the states of the US. To do that, I put the names in the sort list or copy from another spreadsheet.

And then, you can type any name of states and use the drag handle to autofill in cells.

Wrapping Up
In this tutorial, you learned various ways to autofill data in cells or columns in the LibreOffice Calc sheet. Using these methods, you can speed up your data entry and ensure proper data validations.