This is a simple guide on inserting various horizontal lines in LibreOffice or OpenOffice.
Horizontal lines are important visual elements in LibreOffice or OpenOffice Writer documents. A well-defined line can improve the readability of a document by separating blocks of text or paragraphs.
Here’s how you can add them.
Table of Contents
Insert horizontal line in LibreOffice
Method 1: Using the Horizontal Line menu option
LibreOffice
- Open LibreOffice and navigate to the document where you want to insert the horizontal line.
- Put the cursor where you want to insert a horizontal line.
- From the menu, select “
Insert > Horizontal line“. - A horizontal line will be inserted at the current cursor position in your document.
OpenOffice
- Open OpenOffice and navigate to the document where you want to insert the horizontal line.
- Put the cursor where you want to insert a horizontal line.
- From the menu, select “
Insert > Horizontal ruler“. - Then choose the line type and style.
- Click ok. A horizontal line will be inserted at the current cursor position in your document.

Method 2: Using drawing tools
The most traditional way of drawing a line is using the drawing tools. You can add lines anywhere in your LibreOffice or OpenOffice document.
Follow the below steps.
LibreOffice
- Open LibreOffice Writer document.
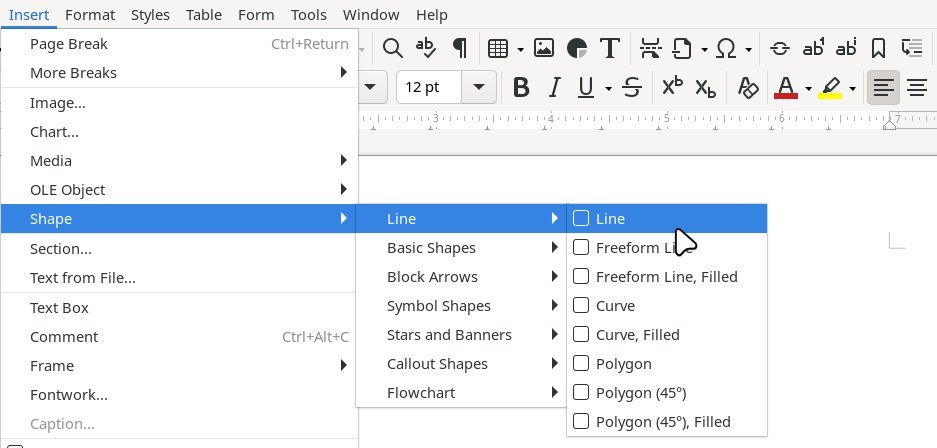
- From the menu, click on I
nsert > Shape > Line. - Now, you can draw the line in the document where you want.
- The line is graphic. Hence you can drag it around places as you wish.
- Similarly, you can use Freeform line, Curve and other variants.

OpenOffice
- Open the OpenOffice Writer document.
- From the menu, click on View > Toolbars > Drawing.
- At the bottom of the Drawing toolbar, select
line. - Now, you can draw the line in the document where you want.
- The line is graphic. Hence you can drag it around places as you wish.

By taking some time to explore the customization options available, it is possible to modify the style of the line easily. This includes adjusting its thickness and colour or adding arrow pointers at the edge.
Wrapping Up
In this article, you learned how to add lines in LibreOffice and OpenOffice Writer documents. I would recommend you take it further by evaluating various options to prepare your desired document formatting.


There is a third and much better way, go with style! Open the style right panel, in the paragraph styles you will find Horizontal line. Duplicate this style by right clicking on it, give it an explicit name, and fiddle with the line style with all the options.
After, a double click on this style will draw the line you decided to draw. Your line can cover any part of the paragraph, your imagination is the limit!
But best, you will have perfect lines all over your document, with the same behavior. Finally, modifying your line style will modify ALL the lines having the same style.
You can’t beat LibreOffice if you work with styles!
Thanks for your comment. Yes, styles are really good in LO. We will modify the article based on your comment.