This beginner’s guide explains how you can rotate, resize and skew any custom shapes or any image object in LibreOffice Draw.
Rotating, resizing, and skewing shapes and images are often needed for various drawing work and activities. This is a straightforward task, and this is how you can do it.
Table of Contents
Rotate Images and Shapes
- Open a blank draw document and insert an image. Select the image.
- Or, draw any shape and select the shape.
- Once inserted, click twice – one after another on top of the image/shape. Or, from the menu select
Shape -> Transformations -> Rotate. This would select the rotate tool. - Shape Menu is available from LibreOffice 6.2x and greater.
- You would see a Red or Orange circle covering the image/shape (see screenshot below).
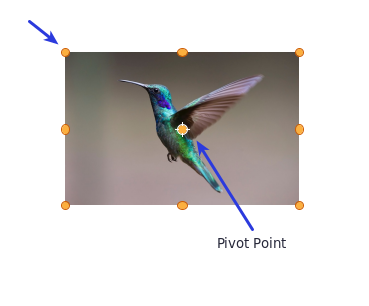
- Put the mouse pointer on any of the corners of your image/shape, and you can see a small rotating pointer. Click and move your pointer to rotate the image/shape.

Tip: The rotation happens based on the pivot point, which is located by default in the middle of the image/shape. You can change the pivot point to a different place to change the rotation based on a point.
Skew Images and Shapes
- Open a blank draw document and insert an image. Select the image.
- Or, draw any shape and select the shape.
- Once inserted, click twice – one after another on top of the image/shape. Or from menu select Shape -> Transformations -> Rotate. This would select the rotate tool.
- You would see a Red or Orange circle covering the image/shape (see screenshot below).
- Put the pointer on the middle sides of the selections, and you will see the pointer becomes a skew sign (see below).
- Now you can drag up or down, side by side, to skew the image or shape vertically or horizontally.
- Skewing is also based on the pivot point, as explained above, which you can customize and move around.

Resize Images and Shapes
- Open a blank draw document and insert an image. Select the image.
- Or, draw any shape and select the shape.
- Select the image/shape – click once on top of the image/shape.
- You would see a green or blue square covering the image/shape (see screenshot below).
- Drag your pointer by moving towards any direction along the small square icons to resize the image/shape (see below).

Conclusion
This is how you can give any size to an image or shape in LibreOffice draw. Drop a comment below if you have any questions.

Where is the option to scale images???????
You can resize the image, though.
It would be nice to be able to resize while maintaining the aspect ratio, say by holding down the shift key while moving the corner of the object.
I have an existing document with pictures that have shapes ie a circle around the picture and want to swap into the circle another picture. When I try all I get is the new picture but I am not able to get it into the circle? Thanks for your help.
Rotate does NOT work!!!! Put back the 90 degree flip.